Tips on Hand Sawing Tools

Sawing is simply defined as a process of cutting any material but mostly woods and metal. Turning out attention to wood, hand or panel saws are used to cut pieces of wood into desired shapes for use mostly in small scale projects. Saw mills are charged with the responsibility of converting logs into wood and are more efficient for large scale projects that have increased work intensity.

Types of hand saws

Hand saws are not only differentiated by the appearance which defines the purpose, but also by the shape of their teeth.

Hand Saw

There are variations of hand saws that are suitable for different purposes:
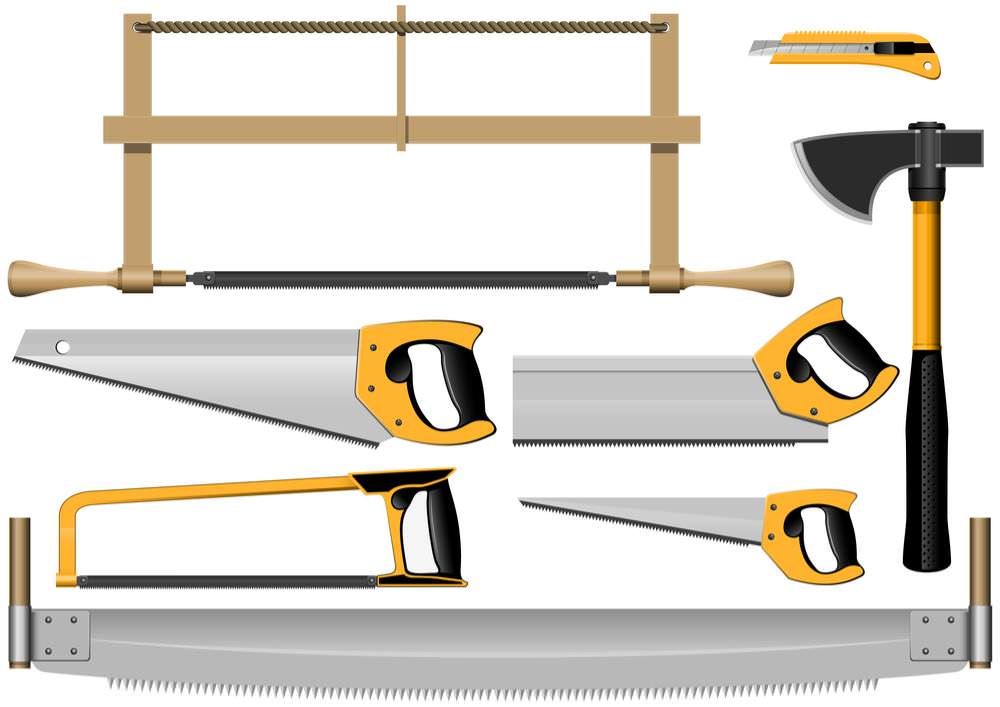
Rip saw

It has huge teeth that have quite some spacing between them reducing their number to five for every inch. The huge teeth means that they are reduced in number for the entire saw thus making it cut a ‘larger length’ for every movement. It cuts along the fiber and the fiber patterns of the wood.

Crosscut saw

Its features and use directly contradict those of the rip saw. It has smaller teeth with more teeth per inch and hence best suited to cut against the fiber patterns of the wood. The teeth arrangement helps the saw remain intact for the cutting process.

Panel saw

It is related to the crosscut saw but with teeth that are closer together. It is best used in the cutting of plywood because it is ‘fragile’ as compared to other types of wood. Plywood is not as strong as normal planks of wood thus it is easily damaged during the hand sawing process. Care, therefore, needs to be taken when handling the wood and panel saw does just that.

Frame saw

It is more of a hybrid saw as it contains a metal frame for personalized changing of the teeth to serve different purposes thus combining the functions of the panel, crosscut and rip saws. It has a good handle for better holding when working with it.

Back saw

It also has small teeth that are closely placed together for excellent and more accurate cuts. Precision is improved with the thick bond that is located along its top thus it cannot curve when it is being used. It is, therefore, a suitable choice for areas that need accurate cuttings like wood joints. It is similar to the Japanese saw except this saw stroke backward instead of to the front.

Coping saw

It is characterized by a thin strip for the blade and superb teeth. The blade is embedded on a frame that is made of metal. The thin stripped blade means that it is easy to curve the saw for curved cuttings. Even with its purpose being similar to that of the scroll saw, their manufacturing designs are different.

Hack saw

It is majorly used with metal work rather than woodwork. It gums up on softer metals and hence cares is to be taken more so when it is used on aluminum material.

Other types of saws are not so common to find. They are mostly used in industrial setups and that is why they are not discussed. These types of saws include: circular saw (sidewinder and worm drive), table saw, oscillating saw, miter saw, band saw and jig saw.

Hand sawing tips

There are a number of tips that could make hand sawing more efficient and fulfilling process:

Cutline

This is mostly done with a pencil or a pen. A pencil is more reliable as changes and adjustments can easily be made. The cutline helps the person sawing in the sawing process thus mistakes are not made leading to wastage of material.
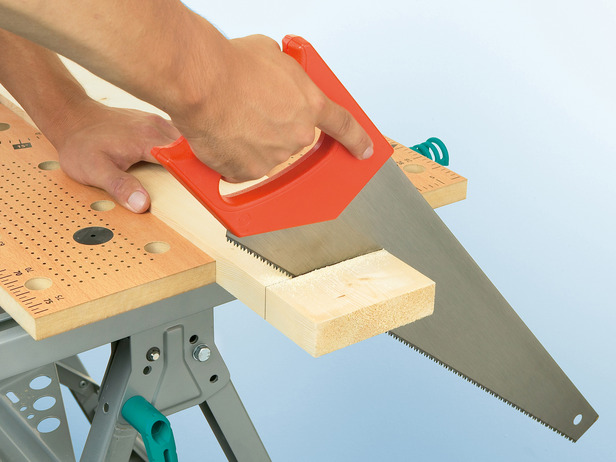
Starting cut

This is where the sawing process begins. Good practice involves using the thumb of the hand that is free to help direct the saw in making the initial cut.

Sawing angle

This is important as it defines the shape of the cut-out. There are different angles depending on the needs of the person sawing and hence the correct angle is determined by the correct positioning of the person sawing. It is good to apply some pressure on the wood like having it beneath the sawyer’s knee to avoid unnecessary movement that would lead to wastage of material.

Holding the saw

The saw should be held as close enough to the sawyer’s elbow as possible with the index finger aligned with the handle for a firmer grip of the saw. Long strokes should be made with deeper cuts. Stroking should not be parallel to the wood as this make stroking difficult. It should be done in the best slanting angle to the wood that can be achieved by the sawyer.

There are a number things to consider when buying a hand saw: teeth size and spacing, blade, ability to flex of the saw, the crown of the blade, the balance, the cost, and the purpose.


How to Choose the Perfect Concrete Handsaw for Your Project

Concrete cutting is a project that could require an assortment of tools to complete. For small to medium sized projects, the most essential tool would be a good concrete handsaw. There are many different types hand sawing tools for cutting concrete. All of these require different levels of skills to operate each one. Without the proper tools, the outcome of your project may result in disappointment for you. Hence, you must be careful when selecting the best handsaws for the job. This article is an overview of the various types of hand sawing tools that you can use for your concrete cutting project.

worker using a concrete hand saw

Origin of Handsaws

The origin of handsaws dates back several thousand of years ago. In fact, this type of tool can actually be seen in the hieroglyphs of the ancient Egyptians. The name that is given to these various types of saws has changed over time. They were also referred to as fish saws or panel saws, to name a few. A typical handsaw looks very much like a tenon saw, however, it has only one sharp flat edge. If you have worked in the concrete cutting industry for quite some time, you have seen an enormous number of handsaws that were often used prior to the age of modern machinery. They are used for cutting stones and slabs of concrete very quickly. These types of saws consist of a handle, the blade and the frame. In order to cut concrete with some degree of precision, you need to select the right type of handsaw.

Selecting the Right Type of Handsaw

Prior to starting a project, it is important that you know which type of saw you are going to need to complete the project. There are many different types, but there are two specific designs from which all saws are made. The first type is called a rip saw and the other type is called a crosscut saw. It is highly recommended to have both types of saws when you are starting a project that requires sawing. It’s good to know the difference between the two. That way, you will know which one to use for each piece of concrete that you are going to cut. This allows you to choose the right saw for each cut that you make.

Difference between Crosscut and Rip Saws

A crosscut saw has a blade has teeth that are angled back, which are effective for cutting precast concrete hollow core slabs. It also has a bevelled edge. Compared to a rip saw, a crosscut saw has much smaller teeth. Its cutting edge is almost knifelike, allowing you to make very precise cuts through concrete. This is something that only smaller toothed saws will enable you to do. A benefit of using this particular type of saw is that it will cut as you push through and pull back when cutting concrete. This makes crosscut saw a much more efficient option.

In contrast, the rip saw is designed to cut through concrete, marble and granite with ease. The teeth of the rip saw do not angle backwards and are not bevelled in any way. Instead, they actually alternate from left to right in a specific pattern. This enables each of the teeth to mimic a chisel, easily chipping away the slab of concrete you are cutting. But, this can only be done when you push into the concrete. Unlike the crosscut saw where you can cut both in a pushing and pulling manner. A rip saw allows you to have a much cleaner cut. This is something that you will want when cutting harder stones and concrete. It is less efficient, however, because when you pull back, it doesn’t cut at all.

Now that you already know the difference between a crosscut saw and a rip saw, it’s time to look at the different types of saws. Each type of saw can be used for each specific type of job that you may have in the future.

Inspecting Your Hand Saws

There are seven important things that you need to do before a concrete handsaw. If you don’t, you could inadvertently injure yourself. At the very least, you could make mistakes with your cuts that could cost you a significant amount of money. Therefore, you must take some safety precautions. Doing this ensures that you will have the best chance of completing your project without error.

The first thing you need to do is make sure that the teeth on the saw are set evenly. If this is not secured, you could end up curving off to the left or right. This is true even if you are pulling and pushing it straight. Make sure that the blade itself is actually straight. The same thing can occur with even the slightest bend or bow. It can cause you to make mistakes.

Next, check if the teeth are actually sharp. This can be done by simply rubbing your finger over the top of the blades. Be careful not to cut yourself. Just do it to make sure that the teeth snagged on to your skin. This clearly shows that they are sharpened as they should be. Once the blade is in place, make sure that the saw feels balanced and comfortable in your hand as you hold it. It should not be top-heavy, nor should it feel awkward to hold. This can affect your straight and true sawing motions that will help you make the perfect cut.

Final checks include looking at the blade crown and the built-in tension on the saw with the blade. Make sure it should be somewhat flexible. If all of these vital aspects are checked already, you are now ready to start your project. With all the inspections having been made, you now have the confidence to make the best cuts every time a sawing job arises.

Tips on Proper Cutting

Once you are ready to make your cuts after putting your cutline on the concrete, start first with your thumb or knuckle holding the concrete as a guide. This helps to make sure that your cut starts off straight. If you are using a crosscut saw, then begin your cut with their teeth that are nearest to the handle itself. The reason for doing this is because it will give you the most control. By making a few quick cuts to notch into the concrete, you will be ready to make the proper strokes. If it is a rip saw that you are using, doing the opposite is true. This is because you are going to use the finer teeth that are located furthest from the handle. Thus, enables you to perform short strokes back and forth.

Once this is done, take a look at the angle of the saw. Make sure to keep it at 45° at all times, as you saw the concrete back and forth. For the most leverage, always keep your elbows as close to your body as possible. People have a tendency to angle the blade away from their body. Holding your elbow close to you will eliminate this problem. It will also give you plenty of power to cut through virtually any type of concrete without having to use too much effort. As long as you are holding the saw properly, with your forefinger extended and your strokes are deep and smooth, you will be able to slowly cut the stone or concrete you have marked.

Tips for Accuracy

To cut concrete as accurately as possible, start by drawing a line while making sure that you are using some type of square or level. Doing this ensures that this guide will keep it perfectly straight, ensuring that your first few strokes are as straight as possible. If you already have an experience with sawing concrete, then you will probably not need to use this guide anymore.

Once you have chosen the proper handsaw for the job and made the recommended safety checks, you are now ready to start your project. Whether you decide to use a crosscut saw or a rip saw for the job, it will depend upon the type of concrete you will have available. If you are not sure if you will be going against or with the grain, you should certainly consider getting both types of saws. This way, you will have several options to choose from. This allows you to make the straight, curved and very precise cuts that will be necessary to complete your concrete cutting project.

Completing your project, whether large or small, requires you to have the proper tools. Selecting the right hand sawing tool is an important part of the process as well. Hopefully, this information can be helpful in selecting hand sawing tool that you will need for your up and coming concrete cutting project. Following some of the tips mentioned above will give you a final result that you will be very proud of.

However, sometimes a hand sawing tool is not only intended for concrete cutting projects. There are times when you need to handsaw a portion of the concreted area in your property. This task may require a skilled professional with the right hand sawing power tools especially designed for concrete. For precise and unmatchable results, you may call on MegaSaw. We are Australia’s leading service provider for cutting and sawing concreted walls and floors. For more information visit us at 12 / 433-435 Hammond Rd. Dandenong South 3175 or call 1300 920 419.

Everything You Need to Know About the Basics of Hand Sawing

Basic Instructions on Using an Old Fashioned Hand Saw Effectively

There are many reasons why you might choose to use a hand saw instead of a power saw. If you are working in a remote area, you might not have electricity for power tools. If you just have a few quick cuts to make, it might be easier to just grab your handsaw than to take out and set up an electric saw.

No matter what your reason, knowing how to use a hand saw properly is a useful and practical skill for anyone who hopes to be reasonably self-sufficient.

In this article, we will discuss the fundamentals of using a hand saw. Read on to learn more.

handsawing basics

Be Ergonomically Correct

Begin by setting up your work space properly:

  • Set the wood at a height that is comfortable for you to saw more effectively with less effort;
  • Your saw should be held at a forty-five degree angle over the wood;
  • Be sure your wrist, your elbow and your shoulder are aligned with the saw blade;
  • Use a shallower angle when making very fine cuts;
  • Use a steeper angle when making very aggressive cuts

Rather that grasping the handle with your whole fist, use three fingers for your grip. Your index finger should be on the side of the handle and pointing downward on the blade. Grasp the handle between your thumb and your remaining three fingers. This grip will give you more precise control.

Be careful not to push hard on your saw. This will just make your work more difficult. You will also get very tired if you push too hard, and this will have a negative effect on the straightness of your cuts. If your saw teeth are good and sharp, you should be able to saw through most materials with little effort.

Begin your cut with short pull strokes to get the cut started. Once you have the blade sunk into the material by a half inch or so, you can use longer strokes to engage the entire blade. When you have almost cut through the material, go back to shorter strokes and add more angle. This will let you finish your cut cleanly.

Recognize the Signs and Symptoms of a Dull Handsaw

If you find yourself struggling to saw and it is taking a long time to cut through materials, you know it is time to sharpen your saw.

Verify this by holding the blade of the saw up with a strong light shining behind it.

You will be able to see that the teeth are dull if light reflects off them. If they are sharp, light will not reflect.

You can re-sharpen your hand saw as long as it does not have a darker stripe along the edge of the teeth. If it does, this means the teeth are hardened and cannot be re-sharpened. If your saw teeth can be sharpened, you will want to engage the services of a professional. Search online or in your local phone book for a local saw, knife and blade sharpening service.

You Can Use Your Saw as a Square

There are a number of shorter tool box saws that have handles that can be used as a square. You will recognize this if you see that the handle is set at ninety degrees and forty-five degrees from the upper blade edge.

If this is the case, you can simply butt the correct edge up against your work in progress and draw your cutting line. Be aware that, while this is very handy, it may not be as accurate as using an actual square.

It’s All Done with Mirrors!

Of course, we are not talking about a real mirror. Instead, we are referring to a well-kept, shiny hand saw blade.

If you want to determine whether or not your blade is perpendicular to the material you are sawing, here’s a trick you can use:

  • Stand in the proper position for sawing and rest the edge of the saw on the material;
  • Look in the side of the saw blade for the material’s reflection;
  • Tilt your saw blade from one side to the other until you see that the reflection of the material on the blade is lined up with the edge of the material

This simple trick will let you know if you are holding your saw perpendicular to the material you wish to saw. Naturally, you must keep your blade clean and rust-free to use this method. Additionally, anti-friction coatings will hamper you from being able to do this.

Hand sawing is becoming a lost art, along with lots of other basic survival skills. When you know how to use hand saws and other hand tools correctly, you give yourself a measure of independence and competence. Follow the tips presented here to make the most of simple hand saws.