Possible Hazards and Warnings During Concrete Removal

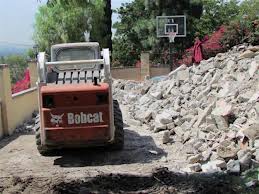
Concrete removal jobs involve different types of hazards. There must be issued a clear and comprehensive warning for possible hazards contractors might face during their job. Here’s a brief list of possible hazards against which the participating contractors are warned.

Trip or Fall Hazards: Contractors are warned to be careful about protruding nails and other sharp objects. Surfaces they are working on must besturdy and not slippery. They also need to wear hard-soled work boots designed to protect their feet against crushing as well as other possible hazards. They must also maintain proper safety by maintaining stable 3-point contact with the ground and also must not stand on the topmost rung.

Chemical Handling Hazards: Contractors must not open or use chemicals with which they are not familiar. Before handling any chemical they must go through the safety data sheets provided by the manufacturers. Even those who are familiar with using chemicals are asked not to mix chemicals for precautionary reasons. Wearing eye protection at the time of handling them is a must.

Noise: Contractors also need to use earplugs to protect their hearing while working around loud equipment like heavy generators or chainsaws.

Head Injury Hazards: While working under low ceilings, or areas with a risk of overhead debris fall, or possible electrical hazards, contractors must use hardhats compliant with ANSI/ISEA 107-2004 standards.

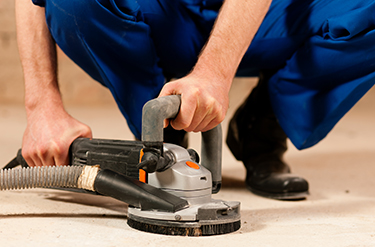
Respiratory Hazards: Due to excessive dust during concrete removal contractors are also asked to use P100/HEPA filtering face masks. They are advised to conduct a seal check every time they use a face mask respirator. This is because apart from dust, other harmful particles like silica, asbestos, laden sand, mold and paint dust may also be present there. Contractors with pre-existing respiratory problems require a medical checkup before taking part in a concrete removal job. In addition, several other precautions are taken to ensure absolute safety while working.

Mold and Biological Hazards: In water damaged buildings, furnishings and materials, there is a high risk of mold contamination. Contractors must use only NIOSH approved respirators while working in those areas. Any porous material that has been wet for more than 48 hours must be removed and discarded. There are also specific instructions about cleaning non-porous surfaces.

Skin Irritation Hazards: When handling fiber glass, concrete or disposables exposed to sewage water, contractors must wear full sleeve shirts to prevent any kind of skin infection and irritation.

Lifting Hazards: The job often includes lifting of heavy loads. Contractors must learn to use safe lifting techniques for preventing any kind of back injury. For safe lifting, contractors should squat and lift. They should avoid bending by their waist when lifting any heavy object. There are also a few additional instructions. They include keeping the load as close to your body as possible; bowing the back and raising the head first while lifting; keeping feet apart; and to avoid jerking or twisting while carrying a load. It is best to wear shoes with no-slip soles. Following these precautionary measures ensures complete safety while working under demanding conditions.

Electrical Safety: Contractors working in cleanup projects and concrete removal jobs must never run a portable generator in closed conditions. The carbon monoxide emitted from the generators is extremely harmful, even fatal in indoor conditions. Shut the generator before refueling. All electric chords must be thoroughly checked for any kind of defect or punches. Contractors are required to use ground-fault-circuit-interrupter or GFCI while working with electrical equipment on a wet surface. They must also maintain a safe distance from grounded power cables. Any electrical equipment coming in contact with water must be checked intensively by a licensed and qualified electrician before switching back on.

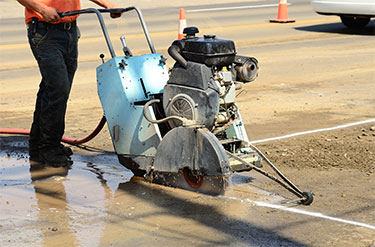
Work Zone Traffic: While working near moving vehicles, it is mandatory for the contractors to wear high-visibility clothing and head protection. They must also use proper devices for traffic control to avert any possible accident.

Chain Saw Safety: There is a great potential for injury with this equipment. If not properly trained to handle chain saw or other similar equipment, contractors must abstain from using them. Even those trained to use them must also wear protective gear like hard hats, face shields, clamps and work gloves for maximum safety.

Contractors should be familiar with all the above mentioned hazards and the necessary protective measures before they indulge in concrete removal or other similar activities.

Methods of Concrete Removal/Demolition

There are several conditions that call for concrete removal and replacement. Often, fixing it with a decorative topping or patching the concrete before resurfacing is considered a short-term fix. However, it will soon display the characteristics of damaged concrete that you tried to repair. Under such conditions, concrete demolition and replacement is mostly recommended to ensure that repair work is done from scratch and sturdy enough to last for long.

So, under what circumstances is concrete removal recommended? Typically, it is where there are widespread and deep cracks or the concrete slabs have sunk that you require prompt concrete removal and replacement.

At the same time, concrete slabs that have too much pitting and spalling on the surface or which shows the signs of frost heave are the ones where replacing the concrete can prove to be more economical and reliable than merely resurfacing the entire concrete.

Different Methods of Concrete Removal

Several methods are used in concrete demolition, which is the first and most important step in replacing the concrete in case of excessive damage and building it all over again.

1. Pneumatic and Hydraulic Breakers

Such type of boom mounted or handheld machine tools are frequently used for concrete removal, which involves pavements, bridge decks, and foundations. The level of work achieved by this method typically depends on the strength of the concrete, hammer size of the breakers, working conditions, and amount of steel reinforcing used in the concrete.

Machine-mounted pneumatic and hydraulic breakers can deliver from 100 to 20, 000 foot pounds at just 300 to 800 blows per minute. To ensure that the maximum amount of work is accomplished in a convenient and hassle-free manner, the breakers may also use remote control operation, telescoping boom for maneuverability and reach, and underwater concrete demolition capabilities.

2. Pressure Bursting

Where dust-free, controlled and relatively quiet concrete removal is desired, pressure bursting – mechanical and chemical – is the ultimate choice. Under mechanical pressure bursting technique, the concrete is spilt using a high-power and efficient splitting machine that operates on hydraulic pressure, powered by a motor. In case of chemical pressure bursting, expansive slurry is inserted into a particular pattern of boreholes.

The demolished concrete is then removed easily by hand or crane. Such methods ensure breaking up concrete structures with minimum dust and noise. Under both the methods, holes aredrilled into the structure and lateral force is applied against the same to split the concrete.

3. Dismantling

In this process, concrete elements are cut into smaller pieces using a saw, thermic lance or water-jetting technique, and then the broken pieces are removed by crane. Such a method ensures minimum impact on surrounding structures, emitting lesser dust and noise.

This is a fantastic technique for demolishing a certain portion of the structure, say slabs or walls.

Water-jetting can be used in cutting both contours and straight line and requires usingthe water catching system and abrasive during the cutting process. On the other hand, thermic lance works especially well on steel reinforcing and eliminates dust and vibration.

4. Ball and Crane Method

This is one of the most commonly used techniques in demolishing a building. Here, a ball, weighing up to 13,500 pounds and a crane is used in demolishing masonry and concrete structures. The ball is either swung or dropped onto the structure that needs to be demolished.

However, the process is not suitable for all types of applications and may create a lot of noise, dust and vibration. Only experienced and highly skilled crane operators should perform the concrete demolition method.

5. Explosives

When large volumes of concrete have to be removed, explosives are inserted into a series of pre-determined boreholes, which blast and cause the structure to break into smaller pieces. The method is indeed flexible and versatile pertaining to work output.

However, air blast and vibration may cause damage to the surrounding structure and it is important to take highest standards of safety measures during the process.

Factors to Keep in Mind Before Buying A Wall Mounted Saw

Wall mounted saws are very effective when there is a need to cut concrete at high heights and flat surfaces. Hence, for creating a clean and precise cut, selection of a wall mounted saw packed with modern technical features and featuring a portable design is necessary.  A highly efficient and versatile wall saw, is certainly a worthwhile investment. However, buying a wall mounted saw involves weighing several important factors as discussed below:

Easy Portability and User-friendly Design

An important consideration when buying a wall mounted saw is its design and versatility. It should be lightweight and designed to be portable, and it should also be easy to store when not in use. Read the mounting features very closely and find out the limitations and benefits it offers when it comes to performing concrete cutting on a bench top surface. Mounting features should provide complete flexibility to mount it at various heights. New modular models are easier to install and use, because they have user friendly controls as compared to several models that are bulky and complex to operate.

Power and Efficiency

For optimum performance of the wall mounted saw during cutting, a continuous water supply plays an important role. For this, it is necessary to buy a wall saw with a water cooled electric motor. Wall saws with this feature are very low weight and deliver remarkable power to the spindle. For seamless performance and control, make sure you purchase one which comes with a high performance two-speed water-cooled gearbox

Blade Type

Another important factor to consider is the versatility of the saw. It is easier to make a wide variety of cuts in length with a wall mounted saw that comes with a T-shank jigsaw blade and replacing the blade should be quick and easy.

Type of Motor

When making cuts on materials with different hardness, a variable speed motor provides better productivity since switching to a different speed for each type of material is easy.  These

machines can be used to create a precise cut for door openings, ventilation channels, window openings, dovetail cutting, special cutting, flush cutting and various diverse applications of concrete cutting.

Blade Guard

There are different makes and models of saws available on the market that come with various blade guard settings. Replacing the blade should be relatively easy for contractors. Don’t forget to read the technical specification on the type of blade, which needs to be used with the wall saw. Blades with various diameters should easily fit with the saw to complete cutting in complex places and precise cutting of various material types.

Remote Controller & Display

Don’t forget to check the features of the remote control which gives you complete flexibility in operating the wall saw at a safe distance. Have a look at the technical features and check for the longest distance from where you can operate the saw and examine the size of the LED display. The technical specs are important  in ensuring the you will purchase a machine that will give you complete control over the sawing process as it provides detailed information about the power level, operating time, current, pressure and service period.

Ease of Maintenance

Finally, an important factor to consider is the ease of maintenance of the saw. Unless the saw is long-lasting and resilient, it will not be a good value for money.  For further convenience, it often comes with a dust port that can be attached to the shop vacuum for keeping the space clean and improving visibility. Thus, it should be extremely convenient and simple to maintain and clean a well-chosen wall mounted saw.

Wire Saw Operation With Cleaning and Maintenance After Sawing

In our previous blog post “Preparing Your Wire Saw”, we explained a step by step procedure for preparing your wire saw for operation. This post explains the next procedure involved in utilising a wire saw efficiently for successful concrete cutting.

For operating a wire saw, you need to assemble it first. Once this is achieved, you can start with the cutting process. Following, are the steps involved in the wire saw operation.

Step 1:

Effective starting of the wire saw is important if you want to ensure the success of your operations. For starters, close the valve on reduction pressure block by counter-clockwise rotation of the knob. When it stops, go for 2 turns back. Now you can start your hydraulic unit. Set to maximum, the feeding flow related to the unit. In order to achieve this you need to turn the controls present on the related remote control in the clockwise direction.

Now you need to create wire tension through careful knob turning on the reduction pressure block in the clockwise direction. Continue with it until you find that the tension in the wire is sufficient. Seating of the wire should be correct on every individual wheel for ensuring an effective operational start to the wire sawing process.

Step 2:

Now the next step is starting the rotation of the motor and for this, you need to turn controls associated with motor rotation present on the remote control in the clockwise direction. Gradually increase the speed of the motor by turning associated controls for generating motor rotation. You should be quite careful regarding the process because this is one of the crucial factors determining smooth wire saw operations.

An effective working pressure is generated when cutting pressure falls between 100 bar to 130 bar. This depends upon a number of wheel sets used in the magazine coupled with the amount of wire used along with the hardness of the material you want to cut with the wire saw. However, during this process it is important to heed a special WARNING! For effective cooling of the wire during cutting, it is important to consider the best cooling water position via adjustment in relation to the material ready to be cut. It is important to stop the machine whenever excessive heat is generated.

Step 3:

Effective cutting occurs when the working pressure goes down. You can visualise the pressure drop on the display and it is important to generate tension in the magazine. For this, you need to turn the reduction pressure block knob in the clockwise direction. The machine indicator displays the magazine output tension and during full tension it is important to stop the machine and wind the wire around a new set of wheels. Now you can continue the cutting process as described above.

Wire Saw Cleaning

Once cutting is over, it is time to clean the wire saw. Clean up all the related equipment and the best way to do this will be to remove the hose from its pivot and then use this water source for cleaning. Cleaning brushes can also be used for doing this effectively. Washers working with high pressure are not appropriate for such processes.

Maintenance

Daily maintenance can keep your wire saw working effectively for a long time. You need to consider regular cleaning with lubrication and servicing. Ideally, you should use professional services after 50 hours of operation.

How To Prepare A Wire Saw For Concrete Cutting

Wire saws, which are usually complimented with a high-performance hydraulic unit, are exceptionally powerful and easy to use, which can handle bulk jobs efficiently. Simultaneously, it comes in a compact and portable design, which is easier to transport from one place to another. Top-notch wire saws can be used for a wide spectrum of applications, both on the ground and mounted on walls. Here is a quick guide on how to prepare a wire saw for operation:

Preparing The Saw:

  1. Determine your cutting needs comprehensively before you assemble the wire saw. This is important to ensure that the saw can be operated with ease.
  2. The key feature of many top-quality wire saws is that they can be assembled for making either vertical or horizontal cuts. If you are looking to make vertical cuts, assemble the saw in standing position. When the cut is to be made on the floor or at floor height, it can be assembled horizontally. Often, it might be necessary to drill holes to allow the wire to go through the material that is to be cut.
  3. In front of the planned cut position, place the saw appropriately. Make small adjustments in the position and then secure it by screwing the anchor bolt down. When you have anchored the saw onto the floor, the adjuster feet needs to be screwed down so that it stands firmly. If the wire saw is not properly secured, it can overturn when the material, which supports the adjuster feet pair, is cut through.

Fit Idler Wheels

wire_sawingWire saws often come with idler wheels, which can be fitted to the machine to assist the precision cutting process. Use of these wheels reduces the number of sharp corners that the wire needs to be pulled around, thus, resulting in less wear and tear on the wire. It also makes the cutting process easier. The wheels also enable the operator to guide the wire in different directions without the need of actually moving the saw unit. Once you have finished the cut, the idler wheels can be used in capturing the wire. Make sure that you position the saw appropriately so that you can stand and operate on the cutter, without the risk of being hit by a broken wire.

Connect the Power Pack

Once you have assembled the saw appropriately, connect it to the hydraulic unit. Here are some tips on how to connect the power pack to the saw:

  1. First, connect the incoming power cable.
  2. Next, connect the incoming water hose of the wire saw to the water coupling located at the bottom of the motor front on the hydraulic unit.
  3. Using the cable provided, connect the remote control and tighten the cable connector screws appropriately.
  4. If the machine comes with a radio, connect the radio antenna instead of the cable, by inserting it into the same socket as that of the cable.
  5. Check if the emergency stop power on the hydraulic unit and the remote control have been triggered or not; simply by moving them in the direction of the arrow.
  6. Confirm what the display shows by pressing the membrane key ‘OK’.
  7. As provided in the instructions, set the pressure reduction block on the power pack
  8. Next, set the hydraulic hoses and water on the power pack and lock the couplings by turning the sleeve so that the slot moves away from the ball
  9. Now connect the hydraulic hoses on the wire saw in the same manner as on the power pack
  10. Connect the water hose to the water coupling located on the saw unit
  11. Confirm that the hoses are connected appropriately

Thread the Wire

Next, thread the wire by following the instructions as provided by the wire saw and hydraulic unit.

Place Cooling Water

Attach the water spears to the outlets provided in the wire saw. The thread wire takes the water into the cut, facilitating concrete dust binding and ensuring that the wire is cooled more efficiently.

Quick Guide On Rock Drilling

There are unique sizes, shapes and colours that rock comes in; however, it is one of the hardest substances to drill into. Delightfully, rocks can be used for a number of purposes, especially in artistry and passionate craftsmanship, and construction. For beginners, trying their hand at masonry for the first time, soft rocks are easier to drill. On the other hand, professionals prefer hard rock for craftsmanship, and many types of construction, which are typically difficult to drill. However, if you have the right tools, drilling through rocks can be far easier. Here is a quick guide on rock drilling.

Things You Need

  • Sharp-tipped marking pencil
  • Diamond- or carbide-tipped masonry bit
  • Hammer drill
  • Sharp file to sand down rough edges

Instructions:

rock_drilling1. Select the type of rock that fits your need. Simultaneously, keep in mind the level of difficulty that you will face in drilling a hole through the rock.

2. Next, determine where you want to drill the hole in the rock. Using a sharp-tipped marking pencil, mark the places in the rock to guide you while drilling through it.

3. Select the type of drill and drill bit. If you are working on a softer rock such as sandstone or limestone, which is less than 7 on the Mohs scale of hardness, it may be fitting to use a masonry drill. For harder rocks, such as granite, you may need a diamond-tip drill bit. If the size of the rock is suitable, you can use a drill press; otherwise, it would be better to select a stronger drill and use it with plenty of water for cooling.

4. Get your cordless hammer drill ready for action by using a freshly charged battery. If you are using an electric handheld hammer drill, make sure that it has an extension cord that reaches the location of the rock.

5. Now, begin to drill through the rock. If the rock is too small, it is important to submerge it in a small container of water to have a better view of the drilling process. For larger rocks, you will need water to be poured continuously over the drilling area as you drill through. Water is needed to cool the drill bit during the drilling process, since rock drilling generates a lot of heat due to friction in the drilling process.

6. Now, position the tip of the drill bit precisely on the mark that you have made on the rock. Slowly lower the tip of the drill bit, making sure it is straight and aligned. Next, press it down on the surface of the rock and keep it vertical and steady.

7. Apply less pressure at first as you start drilling through the rock. As you apply increased downward pressure, you will drill at a faster rate by letting the tip of the drill bit penetrate smoothly into the surface of the rock. Increase the rotational speed of the drill, and apply pressure further. Make sure that you keep the drill bit perfectly straight and aligned until the desired depth of hole is achieved.

8. Keep adding water to cool the bit as you drill through the rock. Remove any particles that may be created during the process. Once the hole is created, use a sharp file to sand down the rough edges, if any.

Warning

Make sure that you wear safety eyeglasses while drilling rock.This is because if the rock or a drill bit breaks during the process, sharp pieces can go flying, creating hazards.

Secure the rock firmly in position while drilling, keeping your fingers away from the drill bit.

Tips:

If the rock is too small, it can be difficult to hold it in position steadily. Hence, it is a good idea to use clamps to hold it in place while drilling.

Selecting The Right Concrete Grinding Equipment and Tools

During the past few years, concrete grinding has advanced considerably and new technological innovations have made concrete grinding much more efficient. To achieve the results you desire, you must select the proper grinding machine and grinding bits that are suitable for your particular job. We will provide you with an overview on how to select the appropriate equipment for your needs.

Types Of Concrete Grinders

There are two different types of grinders currently available, floor models, and handheld models. Handheld grinders are lightweight and are used on walls, door seals, and other above ground areas. Since this type of grinder is handheld, you must control it manually in order to create a smooth surface, unlike floor models which are much heavier and require less manual control. The latest generation of handheld concrete grinders are fitted with type 28 saucer discs instead of type 27 flat discs and this allows the operator to exert more control over the job.

Concrete GrindingIn terms of size, floor grinders are naturally larger in size and also heavier than hand-held grinders and are normally used for resurfacing concrete floors. In comparison with the handheld units floor grinders are easier to control and can also cover larger areas in a relatively short span of time. These grinders also come with a variety of attachments making them suitable for many different kinds of concrete grinding jobs. They may be used to totally resurface a concrete floor or to remove a coating that was previously applied to the floor surface.

Types Of Grinder Attachments

The two head floor grinder attachments currently available on the market are actually a combination of six grinding stones or cutter heads. Each of these heads rotates in opposite directions giving the operator improved control over the grinding process. The standard grinding stones are normally suitable for removing concrete surface of some types of coatings, but if the coating is gummy or thick it may plug up the stones. Concrete grinders with diamond cutters are also available. Diamond cutter are most costly but they last much longer than standard stone grinders and they are capable of grinding at a much faster rate than standard, stone head grinders.

Another excellent available alternative are carbide concrete grinders. Carbide grinders are a better choice for heavy concrete coatings and they can perform with better efficiency on mastics, heavy paints, and gummy coatings.

If you require a high speed concrete floor grinder, the it is best for you to use large size diamond discs. They are perfectly designed for faster performance and are normally used for the purpose of removing painted traffic lines or for completely grinding concrete surface.

While grinding concrete, examine the condition of the concrete surface and select the right grinding tools and blades as explained above.

Potential Problems When Core Drilling With Diamond Core Bits And Their Solutions

Like every other machine tool, Diamond core bits for core drilling have some associated problems and here are a few major issues that operators should be concerned about when working with these core drilling machines.

Reasons The Core Is Not Drilling Properly

  • The hardness of the material is beyond the core drill’s application range.
  • A blunt diamond impregnation can prevent proper drilling and you can alleviate this problem by sharpening the abrasive material or the grinding stone.
  • The core might not drill properly if the speed is too high and this can be solved by reducing the speed.
  • Water flow that is too high can adversely affect drilling
  • Insufficient machine power is another major issue and in that case one is required to have a more powerful replacement.

Wearing Out Of The Diamond Segments

    • The insufficient flow of water often blunts the diamond segments and an operator must ensure that a diamond core bit always gets an ample supply of water.
    • Diamond segments may also become worn from high feed or contact pressure and operators are required to be careful about maintaining an optimum limit.
    • Excessive vibration also blunts the diamond cores and this is best prevented by properly tightening up the screws and applying the correct settings.
    • For abrasive drilling materials it is always a better choice to use harder core bits with suitable segment specifications.

Wearing Down Of The Core Bit Barrel

  • The core drilling systems are not always sufficiently anchored and it is always better to use threaded rods and dowels for proper anchoring and this can considerably reduce barrel wearing.
  • This can also be caused by lack of water flow
  • The core bit must be properly positioned on the motor chuck. Otherwise the barrel might suffer considerable damage.
  • The core bit barrel can become worn if the motor shaft is not turning smoothly and in a scenario like that it is important that it is replaced or repaired as soon as possible.

Apart from the wide number of issues that we have already mentioned above, the diamond core bits used for core drilling job can have several other problems and issues like loosening up or breaking down of the diamond segment, the core bit can get jammed inside the core, cracks appearing on the core bit barrel and also inward or outward bent segments. With proper knowledge of operation and proper maintenance all these issues can be solved and the machine can be operated without any kind of hiccup.

New Projects Updates And Company News

Wet weather makes it tough for September but MegaSaw still manages to look after clients and get the work done. Rain hail or shine, MegaSaw look after their clients’ needs.

Critical Confined Space Project

MegaSaw concurs another Confined Space project for one of its good clients. Our specially trained Confined Space operators had to cut and stitch drill a section of concrete wall and floor in a sewer pump station on the peninsula. All precautions had to be taken using a tripod and safety harnesses as well as poisonous gas detectors to monitor the air quality.

Warning to All Contractors

A MegaSaw Warning on Dirty Diesel Fuel…..A bad batch of diesel fuel has caused havoc with 1 MegaSaw van after fouling fuel lines and blocking injectors. The problem was diagnosed quickly and fixed straight away. Lucky MegaSaw has spare vehicles and machinery so their is no inconvenience to their clients.

Footy Tipping Competition

Footy Tipping…..Unfortunately for the Fellas, Steph the office girl won the footy tipping by 7 picks. Disgraceful guys.

Diamond Tools Conference

For the 5th year MegaSaw gets invited to the Husqvarna Diamond Tools Conference. Only top performers in our industry get an invite to this event and MegaSaw up there again.

Core Drilling Job

MegaSaw core drills holes into a big granite rock feature at The Narcropolous in Springvale. A good client is landscaping a new area for people to be put to rest in. I hope we didn’t disturb anyone?

Cutting Concrete Inside The Building Or Construction Site?

No one can deny the importance of cutting concrete for construction purposes. Nevertheless, it is necessary to take care of safety measures and precautions.

Construction workers have to make do with limited spaces and cloistered areas when dealing with concrete cutting. This renders the job quite difficult and not to say hazardous. It is necessary to demand ample space and proper ventilation for getting on with such endeavors successfully and without untoward happenings. Here below are some safety measures and precautions to take during concrete cutting.

Consider Ventilation

Experts and experienced campaigners believe that ventilation is the most crucial factor it can be the difference between a safe work environment and a hazardous one. If you are working in a confined space, ensure that there is proper aeration available.

Choosing the Right Equipment

In order to ensure that chances of accidents are kept to the minimum use of identifiable, active minds for cutting concrete is necessary. With the high developments in technology, nowadays such instruments are available that can work successfully and uneventfully even in cloistered spaces. Whether there is restricted ventilation or completely closed environment, you can use them with aplomb and get positive results in a hassle free manner. Not only is productivity high but also you can stay away from unnecessary trouble onsite. Equipments using electrical cutting technology use vacuum or water for dust suppression and this make them ideal for closed space or indoor use.

Use of Wet Cutting Technology

Those who are looking for a cost-effective technology coupled with a secure work process do not have to look beyond wet concrete cutting technology. However, this may not be thoroughly suited for indoor use. Professionals need to consider water damage, prevention measures and most utilize vacuum systems or protective sheeting to ensure such protection.

Using the Vacuum System

Another interesting method of successfully dealing with the waste from wet concrete cutting which is in keeping with the latest technological innovations is use of vacuum systems. This system attaches directly with a concrete hydraulic chain saw. This is ideal for collecting the slurry created from wet concrete cutting. This slurry remains collected in a secure tank, which you can roll around easily on a job site. Today, it is also possible to find a vacuum system containing attached floor squeeze mounted on the tank for ease of use.

Health Considerations

Besides taking care of the job site, condition protection it is necessary to remain aware of the health issues related to concrete cutting. Continuous exposure to concrete dust during cutting can lead to a wide variety of health hazards. For example, contact of wet concrete with skin may lead to appearance of rashes, skin irritations, and burns.

Contact with eyes leads to similar results and it may even need medical intervention. Prolonged exposure to concrete dust while cutting enters the lungs and because of the presence of crystalline silica may lead to such serious conditions as silicosis. This disease has long-term repercussions taking away the ability of an individual to work and lead an active life. High degree may even lead to life-threatening conditions. For the prevention of such occurrences, it is preferable, if you wear gloves during the process along with goggles for giving your eyes adequate protection.

Posts navigation